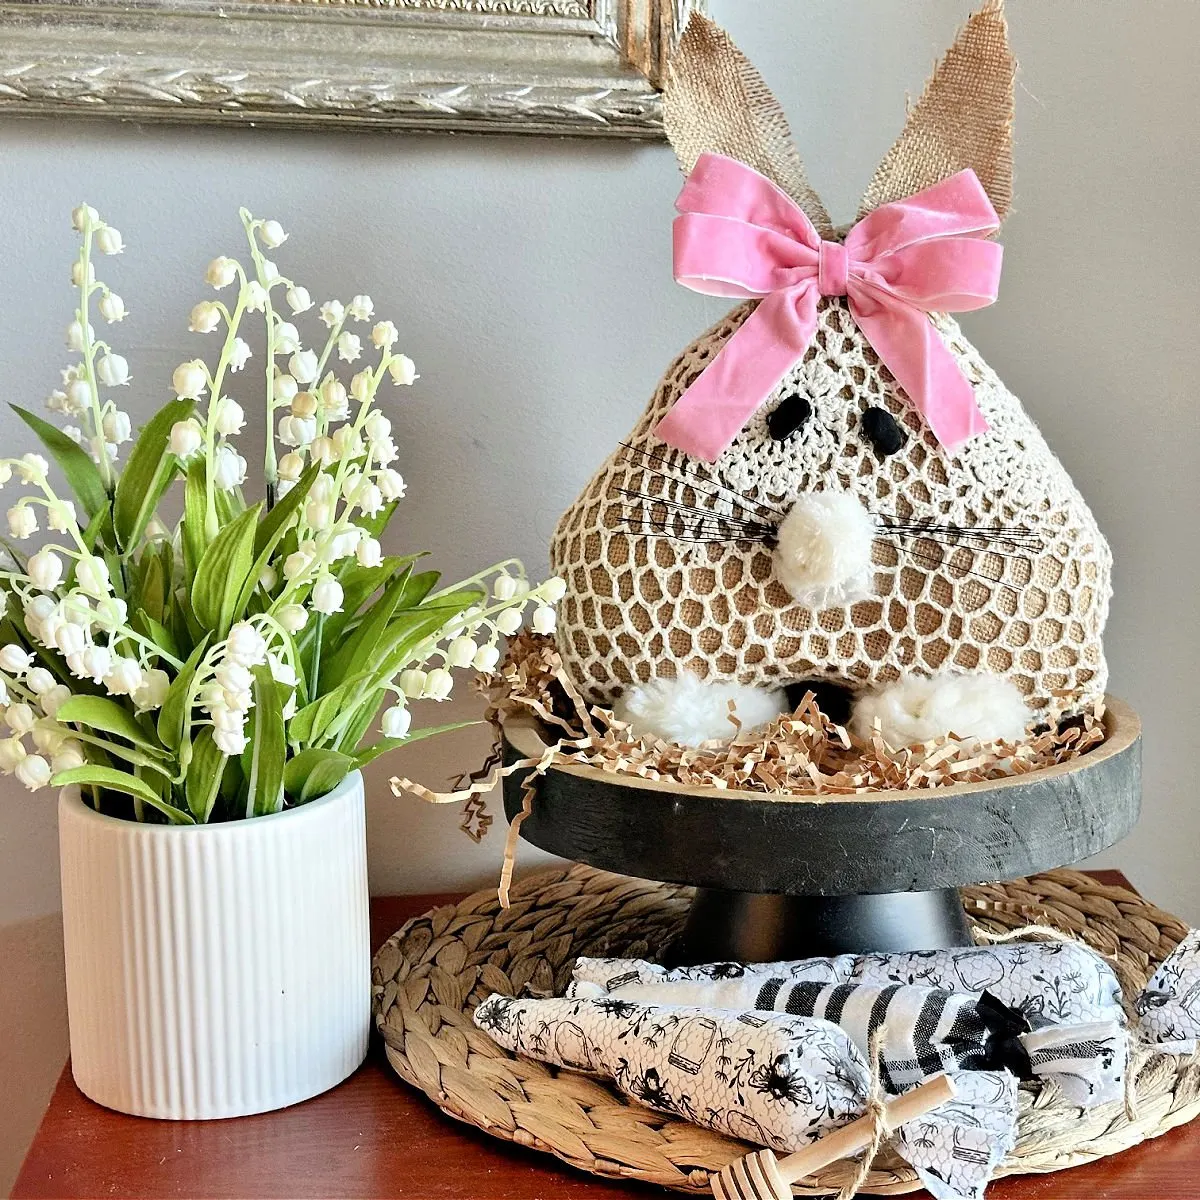
Make a charming Dollar Tree bunny from a foam heart with this simple tutorial. This sweet bunny craft is perfect for spring and Easter decor.

This post contains affiliate links. If you shop the links in this post there is no additional cost to you, but I may earn a small commission. Please see my full disclosure here.
Dollar Tree Bunny Crafts
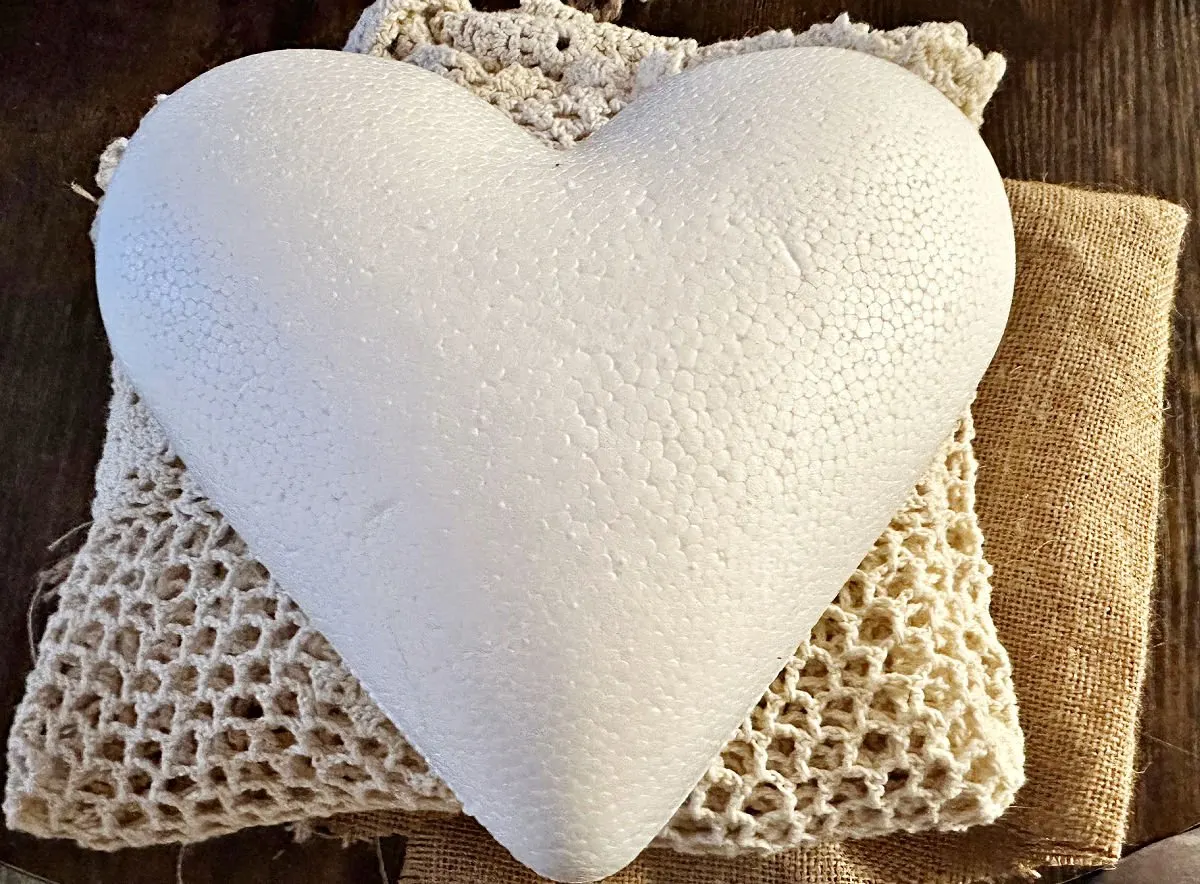
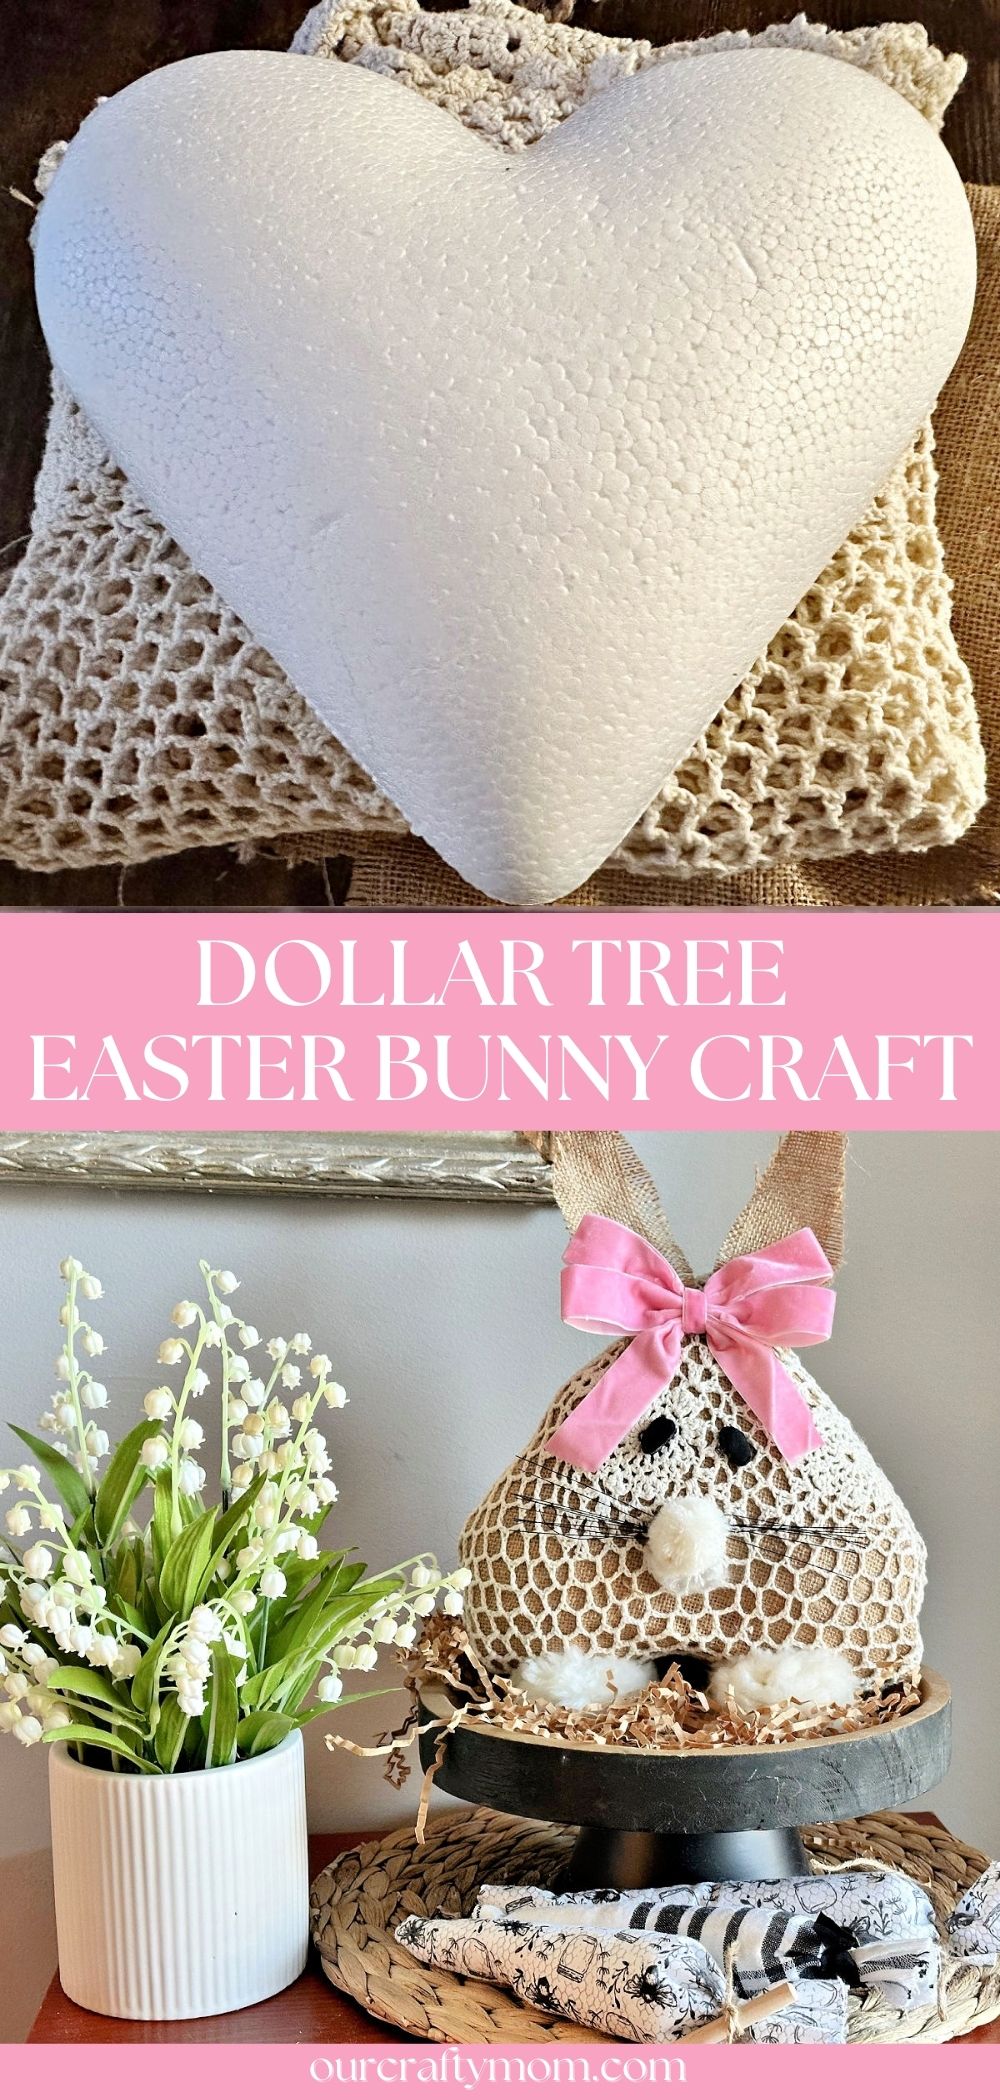
Before you pack away your Valentine’s day hearts, I have a super simple spring craft you can make using the large puffy heart from Dollar Tree.
This is the same heart form I used to make the loop yarn Valentine’s Day heart.
I had an extra one and saw a cute bunny on Pinterest that was made with a wood heart turned upside down. So, I decided to create a fabric bunny with the foam heart.
This is one of those crafts that came together as I went. My first thought was to use the same loop yarn, but I’ve been wanting to make something with the crochet tablecloth I found in my stash.
I’m loving how this Dollar Tree Easter bunny decor turned out and the good news is, it is easy to make and budget-friendly.
For more bunny crafts, be sure to check out these 21 DIY Easter bunny crafts and this Easter bunny busted canvas art with free printable.
Bunny Craft Supplies
Here are the supplies you need to make your own adorable bunny. Also, if you haven’t checked out Dollar Tree recently, they really are the best store for Easter stuff on a budget!
I’ll be back next week with another cute Dollar Tree DIY Easter craft, and it’s not a bunny! 🙂
- Dollar Tree Foam Heart – grab one before they are put away for Valentine’s Day.
- Burlap Fabric – burlap is super affordable and can be used for so many crafts.
- Crochet Tablecloth – be sure to check out thrift stores for doilies, or table covers. I’ve had this tablecloth forever, but it had several large stains that I couldn’t get out making it perfect for crafting.
- Black Foam Board – to make bunny eyes.
- White Pom Poms – you will need one for the nose and two for the feet.
- Pink Bow – these velvet bows are so versatile. I used them in my spring plate wreath and also in a few Valentine’s Day crafts.
- Broom Head – pull out a few black strands from a broom for perfect bunny whiskers.
- Hot Glue Gun and Glue Sticks – this Surebonder cordless hot glue gun is my favorite!
- Floral Pins – these handy pins make it so easy to secure fabric to foam.

How to Make a Bunny From a Foam Heart
Follow these step-by-step instructions to make your own super cute bunny for spring and Easter.
Step 1. Cover Heart With Burlap
Start by cutting your burlap to fit around the heart. It is easier to work with if you cut a large square of fabric.
I’m not one for measuring, but simply lay the heart on the burlap and cut to size.

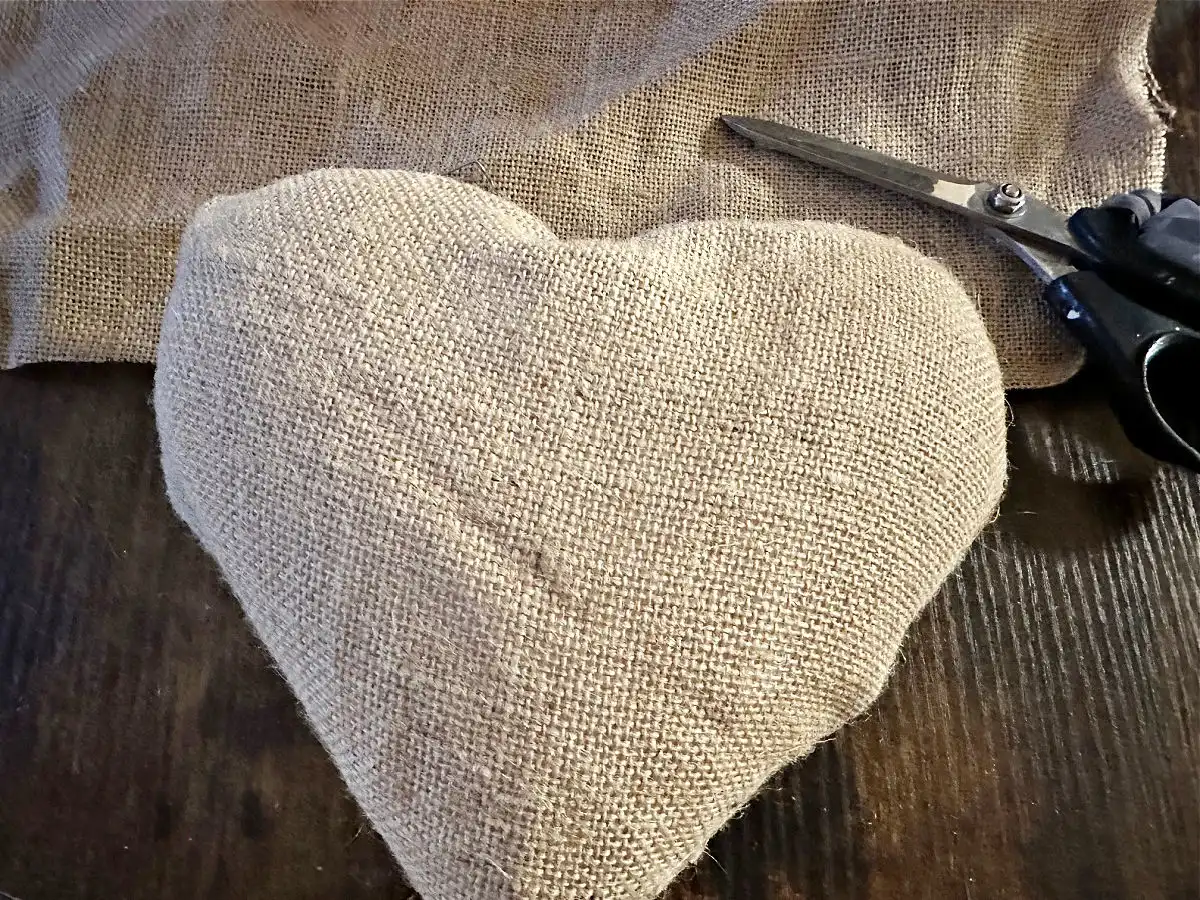
Secure the burlap to the heart using your floral pins in the back of the heart.
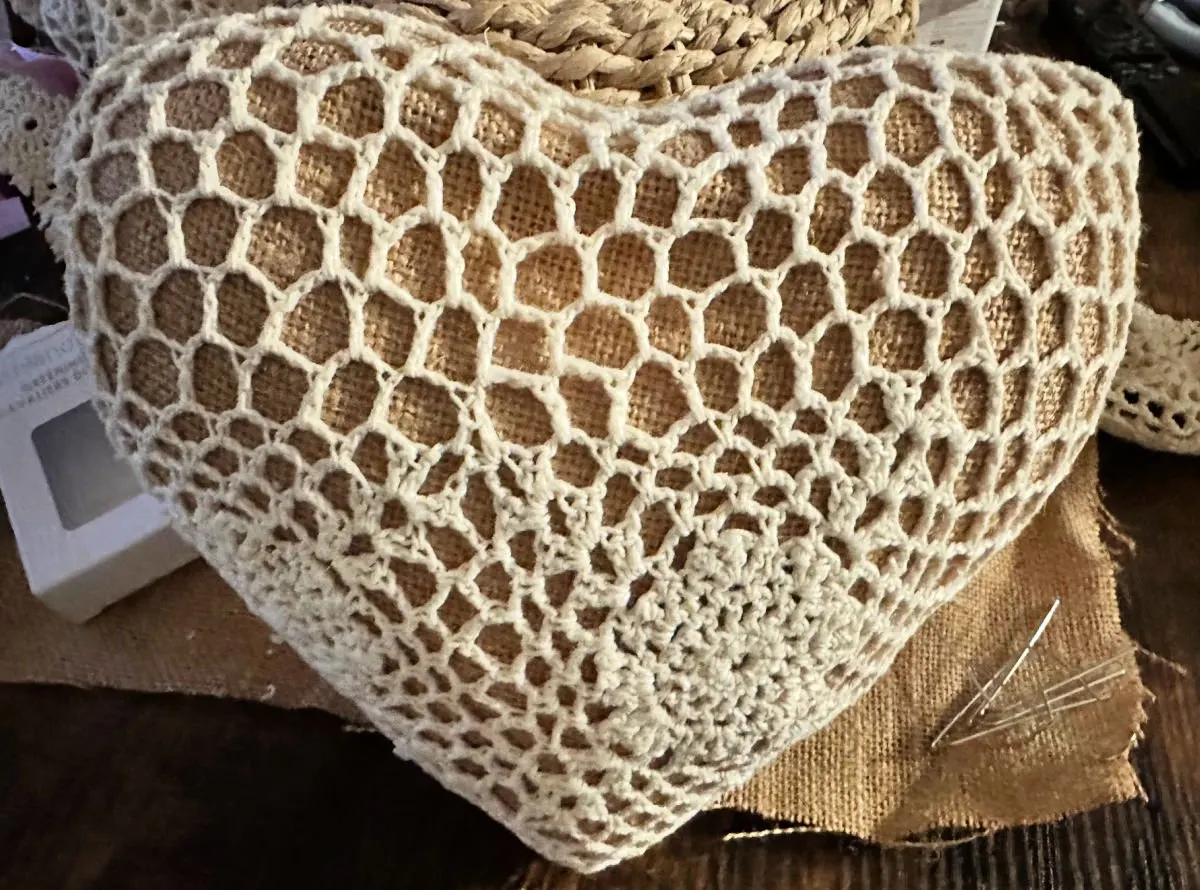
Step 2. Cover with Crochet Fabric
Cut the crochet material to size and secure to the heart.
I found it worked best to remove the floral pins from the burlap and place them back into the layered burlap and crochet fabric.
That way it is less bulky and you are using less pins. Be sure to pull the fabric tightly.

Step 3. Make Bunny Ears
Cut out two pieces of burlap in the shape of bunny ears. They do not have to be perfect.
You can always trim them to get the size and shape that you want.


I chose to pull the edges of the burlap so it had an unfinished edge, but it is totally up to you how you want the ears to look.
Hot glue them to the top of the bunny with one to each side of the point.
If you prefer them to be a bit more rigid, you can also cover cardboard or foam board with burlap as I show in this Dollar Tree bunny wreath.
Step 4. Attach Bunny Nose and Whiskers
Hot glue a pom pom to the center of the bunny head for the nose. Attach whiskers using the broom brush pieces. A light dab of hot glue or E-6000 will work.

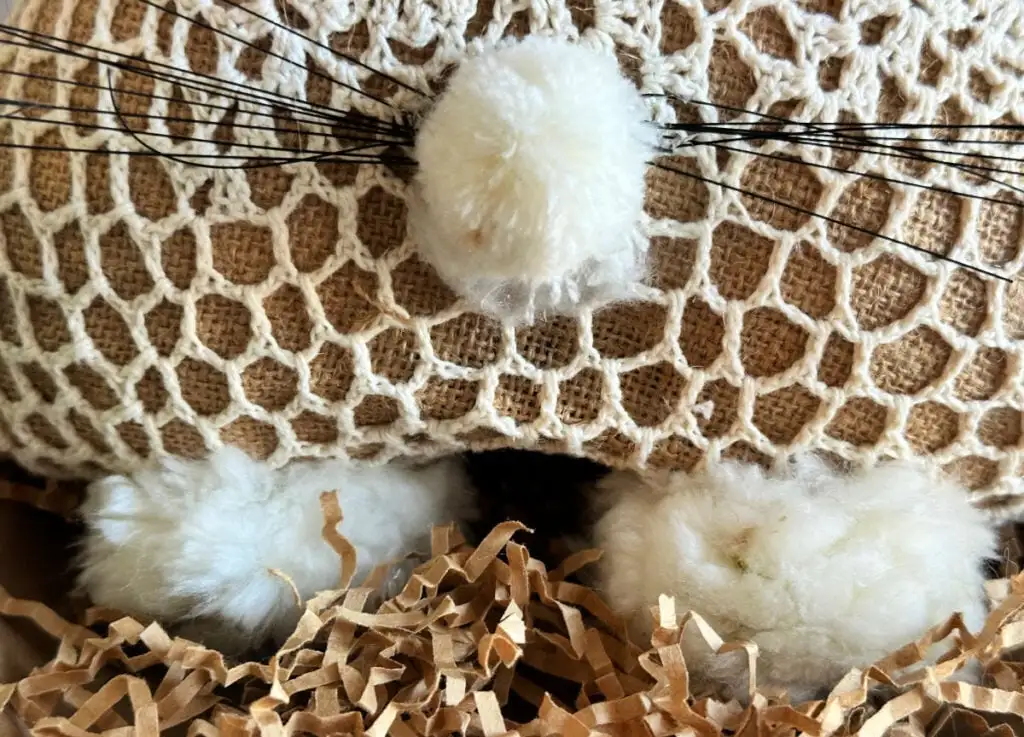
Secure two additional pom poms to the base of the bunny for the feet, also using hot glue.
Step 5. Make Bunny Eyes
Now it’s time to make your bunny eyes. I wasn’t sure if I should paint the eyes, or use buttons.
I tried a few different options, and chose to go with black foam board cut in a small oval shape.

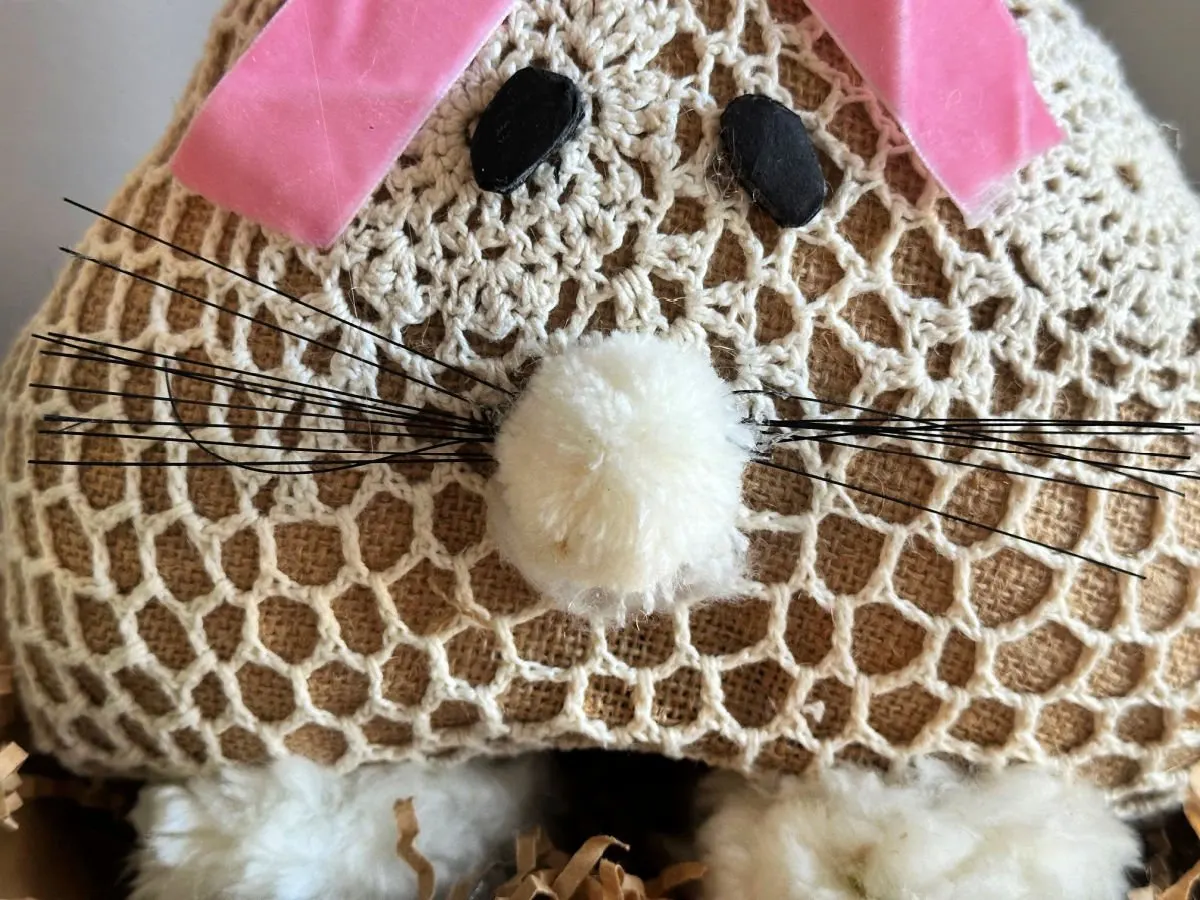
Most of the bunnies I looked at had simple black eyes. When I tried to go with something painted, or a bit pronounced, it detracted from the bunny face. Sometimes, easier is better!
Step 6. Attach a Bow
The final step is to secure a sweet pink velvet bow to the center of the bunny. This adds to the cute factor, but also covers up the bottom of the bunny ears.

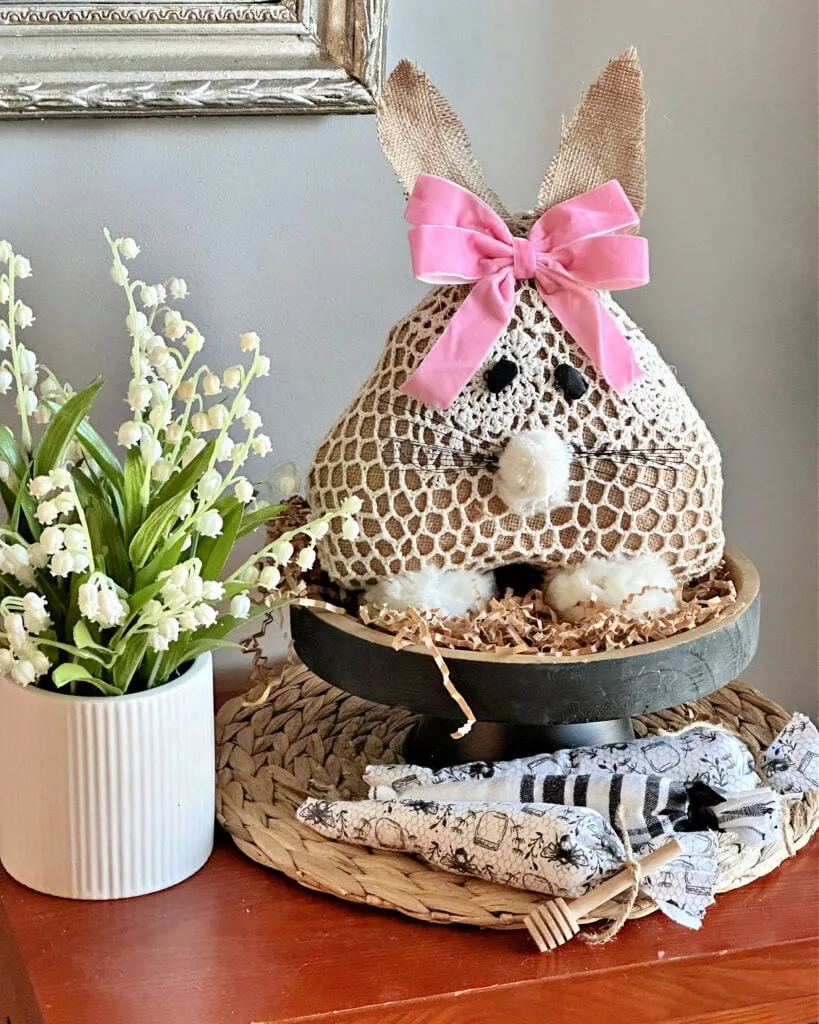
That’s all there is to it! Now you have an adorable Easter bunny craft that you can add to your spring and Easter decor.
To make it stand up, add a couple of pieces of foam board to the pom pom feet. Though, I didn’t do this and it still stood up.
Decorate With Your Bunny Decor
This bunny can be displayed on a side table, buffet, bookshelf, or even placed in a dough bowl or basket with other seasonal decor.

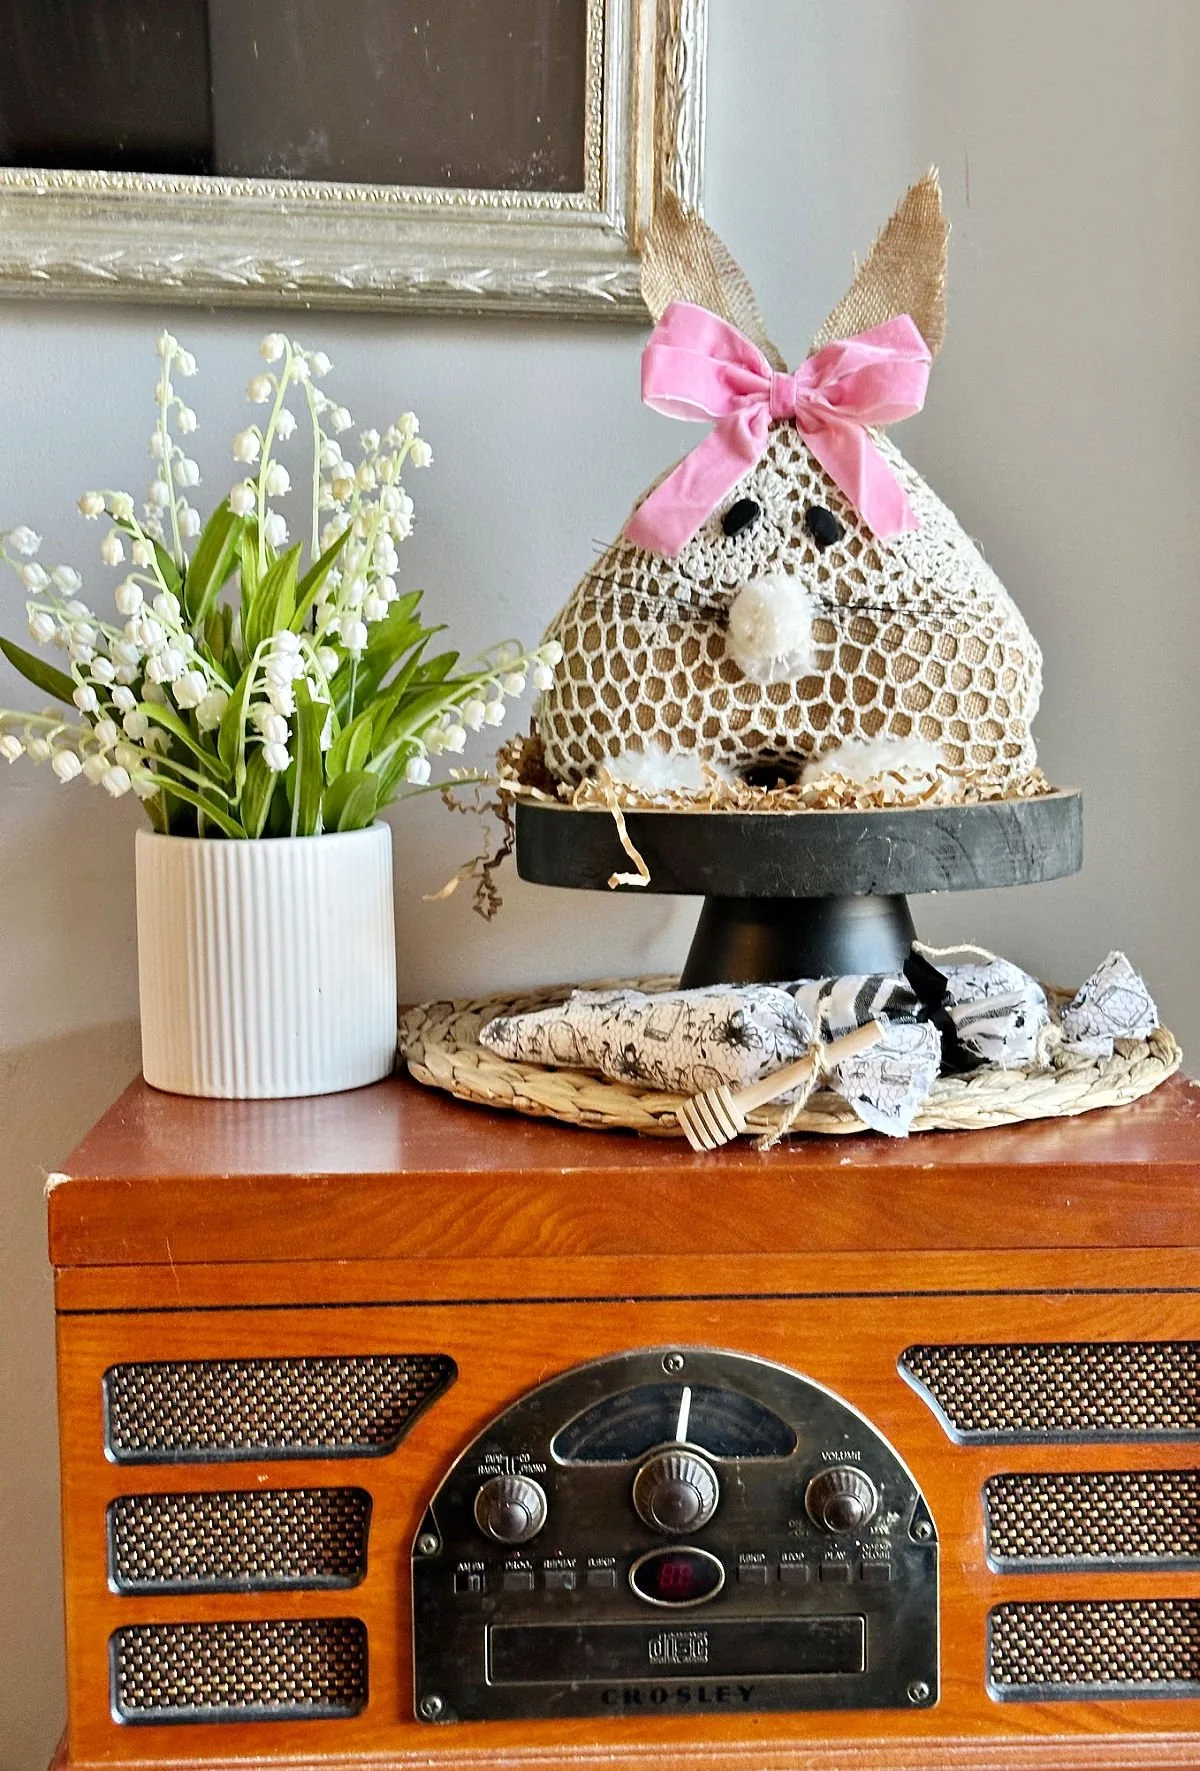
It’s such a statement piece that can be enjoyed year after year. The crochet doily is an unexpected touch!
How would you decorate with your bunny craft?
PIN FOR LATER
I’d love it if you would share this article with your friends on Pinterest by pinning the below image.
It helps my blog grow and doesn’t cost a thing! 🙂
Thanks so much for stopping by. Happy decorating!


For even more Dollar Tree bunnies, check out these home decor and craft ideas:
- Dollar Tree Easter Crafts
- Free Printables Easter Wall Art
- 101 DIY Easter Decorations
- Fluffy Bunny Wreath
- Martha Stewart Inspired Floral Easter Basket
Follow me on social media below: